At BigML, we strive to bring the power of Machine Learning to as many diverse environments as possible. Now you can easily power your Internet of Things (IoT) devices with Classifiers, Regressors, Anomaly Detectors, Deep Neural Networks, and more with the BigML bindings for Node-RED.
The BigML Node-RED bindings aim to make it easier to create and deploy ML-powered IoT devices using one of the most used development environments for IoT: Node-RED. Node-RED is a flow-based, visual programming development tool that allows you to wire together hardware devices, APIs and online services, as part of the Internet of Things. Node-RED provides a web browser-based flow editor which can be used to visually create a JavaScript web service.

Thanks to the BigML Node-RED bindings, you will be able to carry through ML tasks using the BigML platform. For example, tasks such as creating a model from a remote data source, making a prediction using a pre-existing model when a new event occurs, and so on, will be as easy as dragging and dropping the relevant BigML nodes on to the Node-RED canvas and wiring them together. As a bonus, the BigML Node-RED bindings are based on WhizzML, our domain-specific language for automating Machine Learning workflows. This will allow you to easily integrate your Node-RED flows with any advanced ML workflows your use case requires.
Setting up Node-RED with the BigML Node-RED bindings
Let’s see first how you can set-up your Node-RED environment. Installing Node-RED is super-easy if you already have Node and npm installed on your machine. Just run the following shell command:
$ sudo npm install -g --unsafe-perm node-red
Once Node-RED is installed, you launch it by executing the following command:
$ node-red
Now, you can point your browser to http://localhost:1880/ and access the Node-RED visual flow editor, shown in the image below.

Note that there are alternative ways to install and run Node-RED on your machine or IoT device. Check the documentation linked above for more options.
Your first Node-RED flow with BigML: Creating an ensemble
Now that you have Node-RED installed on your machine, we can define a flow to create an ML resource on BigML.
To get a rough idea about the way Node-RED works, let’s create a very basic flow that outputs some JSON to the Node-RED debug console. Once we have that in place, we will add a BigML node to carry through our ML task.
As a first step, just grab the default inject and debug nodes from the node palette on the left-side of the node-RED editor to the middle canvas. Then connect the inject node output port to the debug node input port. You should get the flow displayed in the next image:

Notice the two blue dots on each of the nodes. That is the Node-RED way of telling you those nodes have changes that have not been deployed yet. When you are ready with your changes, you can deploy them by clicking the red
Deploybutton in the top-right corner. If everything looks right, Node-RED will update the status of the nodes by removing the blue dot.
You can customize the two nodes by double-clicking on each of them and configuring their options. For now, just click the Deploy button and then the small square box left of the inject node. This will make a timestamp message to be injected in the flow and reach the debug node, which simply outputs the message payload to the debug console, as shown in the following image.

Now, let’s build a Machine Learning workflow to create a new model from a remote data source. As you likely know, this requires three steps:
- Creating a BigML source from your remote data source.
- Creating a dataset from the source.
- Finally, creating the model using that dataset.
So, our Node-RED flow will include three nodes, one to create the source, another to create the dataset, and another to create the model.
Before doing this, we will need to install the BigML Node-RED bindings, which will require going back to the command line. If you have not modified Node-RED default configuration, it will store all of its stuff in its user data directory, which is ~/.node-red by default. In that directory, you can install any additional Node-RED nodes you would like to use as npm packages. In our present case, just execute the following command to have the BigML Node-RED bindings installed:
cd $HOME/.node-red
npm install bigml-nodered
Then restart your node-red process to have it load the new nodes. This should populate your Node-RED node palette with a wealth of new BigML nodes, as the following image shows.

Now, you can drag and drop the BigML nodes we mentioned above and connect them as in the following image. Thereafter, we are going to configure the nodes appropriately.

To configure each node, double-click it and then set its properties as described below:
Source:

Dataset:

Ensemble:

Reify:

As you can see, each node contains a real wealth of configuration parameters. You can find a thorough description of each of them on the BigML API page. For the sake of this example, we have just modified the description associated with each node.
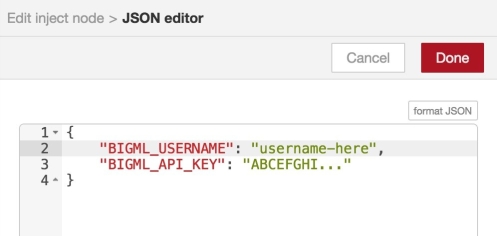
Before attempting to execute this workflow, one important thing we should consider is authentication. The BigML API, which the BigML Node-RED bindings use, requires a user to authenticate themselves by specifying a username and an API key. We should provide this information if we want BigML to execute our flow. The BigML Node-RED bindings support several ways to specify authentication information. For this example, we will resort to providing username and API key in the payload message. To do this, we will customize our inject node so it initializes the message payload with a specific JSON. First, we will change the inject node type to make it a JSON node, as displayed in the following image.

Next, we will define the JSON as in the following image, so it contains our API credentials.
With the credentials set, we can finally inject the message into the flow, which will effectively start the execution. This flow will create a source, a dataset, and an ensemble in your BigML account using the specified arguments. If you go to your BigML Dashboard, you can check this out for yourself and see how the created resources look and use them as any other resources that exist in your Dashboard. Since we are using a Node-RED debug node at the end of our flow, we can additionally inspect our flow results in Node-RED debug sidebar, as shown in the following image.

There, you can see how each node’s output was stored in the message payload under the corresponding output port name. This property enables the use of any node’s output in downstream nodes – provided they are not overridden by any intermediate node.
Conclusion
In this first instalment, we have just skimmed the very basics of using BigML with Node-RED. In a second instalment, we will create a more complex flow, which will give us the opportunity to cover important topics such as input-output connections, debugging, and so on. If you are developing IoT devices and would like to leverage our best-in-class Machine Learning algorithms to make them more intelligent, do not hesitate to get in touch with us at support@bigml.com.
Leave a Reply